Today we start a great series! We will start with the real basics. Installing Python in our system. I use two computers on a daily basis. A desktop Windows computer where I work when I need to multi task a lot or when I want to just play some games. And a Mac Mini m1 when I want to feel forced to code. We will install python on both.
Installing Python is really easy so we will take the time to do a few other things. I’m a big fan of JetBrains and I use all their products for the different situations. They do have a Python IDE but I’ve decided to take the opportunity to move to VS Code, I’ve never really given it a chance and it seems 99% of developers use this IDE (including the new AI IDE’s).
Today we will cover the following things:
- Install Python on Windows
- Install Python on Mac using Homebrew
- Find the best Python extension for VS Code
- First mini-project: Create a setup verification script.
Installing Python on Windows
Python is easy to install on either of the operating systems we will be working on. For windows we have two main options. Installing from the Microsoft Store or downloading from the Official Site.
If we visit the Microsoft Store and search for Python we will see the following screen
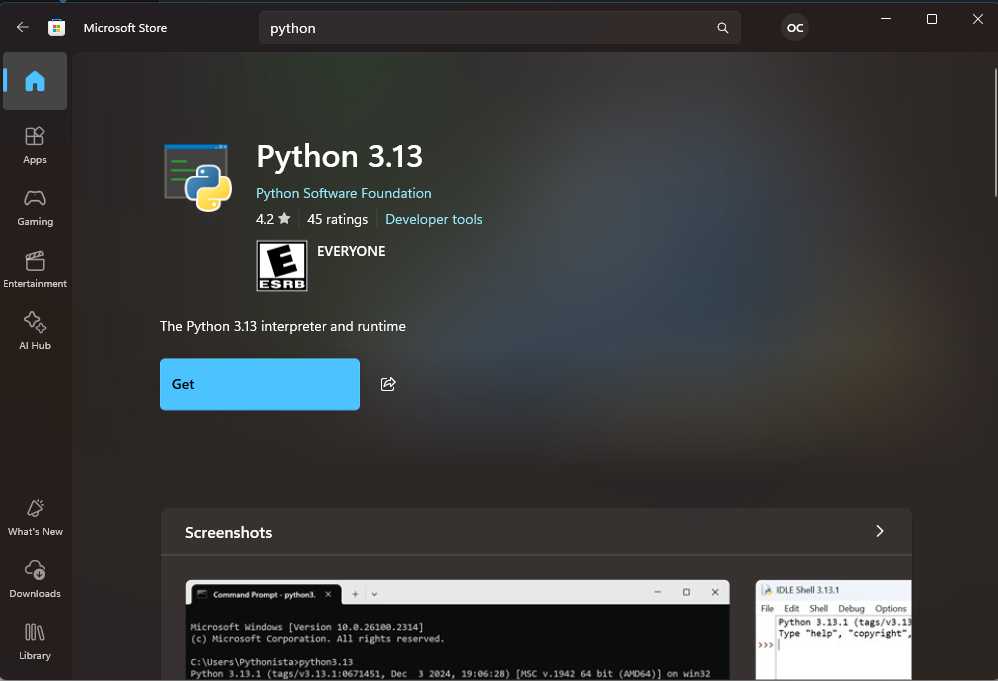
We only need to click on “Get” and everything will be installed and ready to run, it will even registers Python in the PATH so we can run python from the Terminal.
If we prefer to download it from the Official Site, make sure you download for the proper architecture (x32, x64 or ARM64). When running the installer check the box that says “Add python.exe to PATH”. By doing so we won’t have to manually
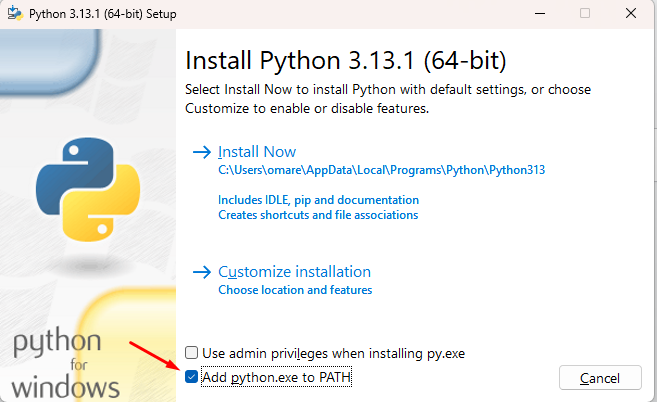
Just need to click on “install Now” and we are on our way! Pretty straight forward installation process. The process for Mac doesn’t change that much so lets get to it!
Installing Python on Mac
We’ve seen that for windows there’s two easy ways to install Python with a GUI. For Mac we have GUI installer from their Official Website. Once we complete the download of the version we want we can just run the installer package file (.pkg).
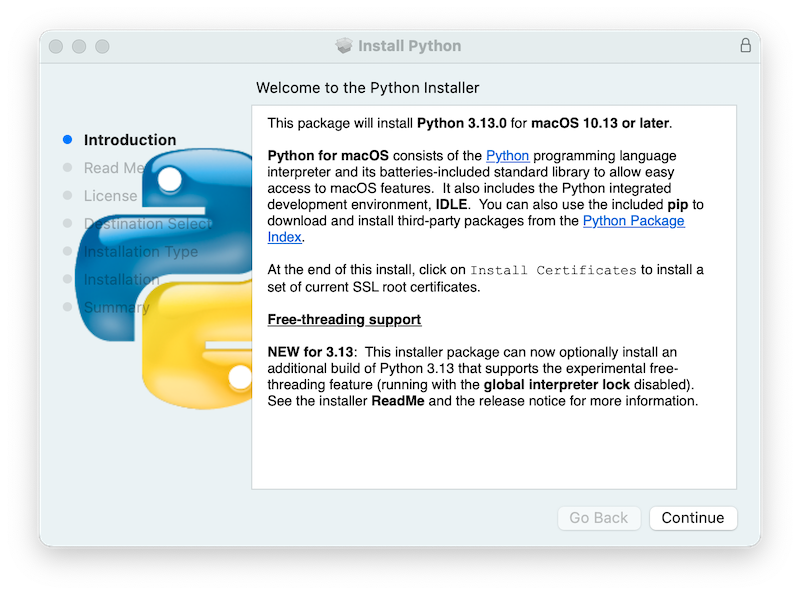
Once we complete the installation we will get a message that we need SSL root certificates. To have a more detailed guide you can visit this page and read the final instructions.
This is easy enough and should work like a charm. Personally I like using Homebrew for my packages. To accomplish the installation of Python through Homebrew, we just need to visit the Formulae page for Python. Here we can see that we need a simple command
brew install python@3.13After completing the installation we can use python3 --version to check that it’s installed properly. You might prefer to use python rather than python3, if so you can read this Stack Overflow post that shows how to create the alias.
Python extension for VS Code
Seems like a great idea to change IDE when learning a new programming language, seems like an extra challenge. I’ve used JetBrain IDE’s for so long that I’m not sure if I’ll get use to VS Code, but it’s worth a shot. To make sure I take advantage of the IDE I’ve decided to look into Python specific extensions to add to the IDE as I will be primarily using it for Python.
Now there will be other extensions that I’ll install to make my life easier like a git manager, prettier and some visual helpers. But for now let’s focus on Python. Here is a list of posts that seem to think they found the best extensions for Python. I’ll be testing some of them and picking the ones I like the most but as reference might as well just list them here.
- Top 10 VS Code Extensions For Python [2025]
- 10 Essential VS Code Extensions for Python Development in 2024
- Top 10 Best Python Extensions for Visual Studio Code 2025
I won’t go into each of the extensions I’ve selected as these three posts cover them pretty well but I will show the ones I decided to install with you:
- Python by Microsoft
- Pylance
- Python Docstring Generator
- AREPL for Python
- Python Indent
We have Python installed and also some hopeful extensions for VS Code, I think we are set to start with the actual Python code!
Create a setup verification script
The purpose of the verification script is to check what version of Python we are running and to output the OS we are using..
I’ve been reading a little bit about how Python works. The code structure might seem a bit strange since I’m use to using brackets everywhere. Python uses indentation to define if something is part of a code block or not. Starting a new line at position 0 indicates that it’s a new set of steps. An if-else statement looks like this:
a = "b"
if (a == "b")
    print("The value of a is b")
else:
    print("The value of a is not b")
Defining a function is pretty straight forward. They use the keyword def before the name of the function and the parameters are also between parenthesis:
def test_function(a, b):
    print(f"The value of a is {a}")
    print(f"The value of b is {b}")
Since we how to create a function and basic syntax. Let’s jump straight into our task. To obtain the version of Python we are using we need to use the module sys. And to get the OS we are running we need the module platform.
We will be creating two functions, one called get_python_version and the other get_os. From the documentation for each module we can get some of the methods available and we can create our functions.
import sys

def check_python_version():
    print("Python Version:", sys.version)

check_python_version()
This small script will output the Python Version we have installed. I got:
Python Version: 3.13.1 (main, Dec 3 2024, 17:59:52) [Clang 16.0.0 (clang-1600.0.26.4)]
It was pretty straight forward to get the version from sys and to output it. We will now get the OS information. We will get the system, release, version and platform just to complicate ourselves.
import platform

def check_os():
    os_name = platform.system()
    os_release = platform.release()
    os_version = platform.version()
    platform_info = platform.platform()

    print("Operating System Information:")
    print(f"OS Name: {os_name}")
    print(f"OS Release: {os_release}")
    print(f"OS Version: {os_version}")
    print(f"Platform Info: {platform_info}")

check_os()
A variable is defined for each of the items from platform module that we want to get. Interesting fact.. I didn’t know you need to put an f in front of the string you want to print to output a variable… it took me like 10 minutes to figure this out. The output should look like:
OS Name: Darwin
OS Release: 24.3.0
OS Version: Darwin Kernel Version 24.3.0: Thu Jan 2 20:24:06 PST 2025; root:xnu-11215.81.4~3/RELEASE_ARM64_T8103
Platform Info: macOS-15.3-arm64-arm-64bit-Mach-O
We now have the two functions we set out to create. But we would have to create two files and run them individually to get the info. Why not put them in one file…
import sys
import platform

def check_python_version():
    print("Python Version:", sys.version)

def check_os():
    os_name = platform.system()
    os_release = platform.release()
    os_version = platform.version()
    platform_info = platform.platform()

    print("\nOperating System Information:")
    print(f"OS Name: {os_name}")
    print(f"OS Release: {os_release}")
    print(f"OS Version: {os_version}")
    print(f"Platform Info: {platform_info}")

check_python_version()
check_os()
This is our final first script. I added a line break to separate the OS information from the Python version.
This concludes our first day of Python. I think I overextended in the installation section of this post but I think it helped me see how I want to write things out.
Tomorrow we will dive into Basic Syntax, Variables and Data Types. We did see some of that here but we will go into further detail tomorrow.
Be First to Comment